Friday, 30 November 2012

Editing the Album Cover's Spine


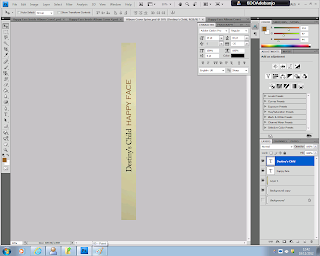
To create the album cover's spine, I created a canvas sized 1cm x 12cm.


I selected and copied a small section of the background of one of the photos I had previously edited and used in my album cover.


I pasted this onto my 1cm x 12cm canvas then stretched it out to fit the whole length of the canvas.


After stretching it out, I used the brush tool, in colour white, at a low opacity, to make the whole thing slightly paler.


I added the text 'Happy Face' in the same font and colour I had used for the same text on the front cover. I rotated the text then placed it near the centre of the spine, but slightly higher.


Next I added the text 'Destiny's Child' in the same font and colour I had used for the same text on the front cover. I rotated the text then placed it beside 'Happy Face', in the centre but slightly lower.


I pasted the company logos that I had previously used on the bottom of my album's back cover, rotated them, then placed them at the bottom of the spine.


I then copied out the numbers on the barcode on my album's back cover, rotated the text then placed it at the top of the spine.


I used the brush tool again, in colour white, at a low opacity, to put a slight, white highlight behind the album title and the band name, so that they stand out on the spine.


This is my final album cover spine.

Thursday, 29 November 2012

Editing the Album's Second Inside Cover


For the second inside cover of my album I used the dark brown tinted canvas I had created previously for my first inside cover, then used the blur tool on the whole picture, to put the photo-strips out of focus.


I then went online and copy and pasted the lyrics to the song 'Happy Face', which is also the album title.


I pasted the lyrics into three columns along the page. I used the font 'copperplate gothic light', which is the same font I used to write 'Happy Face' on the front cover, however, here I used it in the colour white.


This is my final album cover inside 2. 


Wednesday, 28 November 2012

Editing the Album's First Inside Cover


Just as I did for my album's front and back cover, I created photo-strips for the inside covers. However, this time each strip was 2cm x 12cm, meaning there were to be six strips (two for each band member), with eight pictures per strip.


I created a 2cm x 1.5cm canvas for each picture.


Because I needed more pictures of each band member for the inside cover, I edited a few more pictures using the same effects on the same website (picmokey.com) that I had used previously. I opened up my first picture onto Adobe Photoshop CS4. 


I copied and pasted the first picture into my 2cm x 1.5cm canvas, where I reduced the size of the picture to fit into that canvas.


Then I selected the small picture and copied it.


I pasted it onto the 2cm x 12cm canvas, then moved it to the top.


I then repeated this for the next seven pictures, until I filled up the whole photo-strip  I copied this strip onto my 12 cm x 12cm canvas.


I then deleted four of the pictures from the first strip, and moved around the remaining pictures on the strip. Next I pasted in four different pictures of the same actor, still pulling silly faces. I then copied this new strip onto my 12cm x 12cm canvas.


After repeating these steps for four more photo-strips with the other two actors, I used the brush tool  at a reasonably low opacity, in the colour brown, to give the whole thing a dark, brown tint. 


I used a 'handwriting' style font to write a quote by the lead singer of the band, because it gives the quote a more personal feel. I used white for the font, to make it stand out more against the dark tinted background.


In realised that the type of font I used was a little bit hard to read, so I increased the boldness of it. I also added '-Beyonce' below the quote.


I did not increase the thickness of '-Beyonce', to make sure that the audience does not mistake her name for part of the quote.


This is my final inside cover 1.


Tuesday, 27 November 2012

Editing the Album Back Cover


For my back cover, I used the 12cm x 12cm canvas with the three photo-strips that I had previously created for my front cover. Firstly, I applied a 'blur' effect to the whole picture.


I went online and saved a picture of a barcode. I then opened this picture up on /adobe Premiere Pro, and copied it.


I pasted the picture of the barcode onto my album back cover, then moved it to the bottom right hand corner. Then I added the track list to the centre of the album back cover, in  black 'adobe caslan pro' font, to match with the font I used for 'Destiny's Child' on the front cover. The list of tracks I used, all relate to the album title, and follow a theme of happiness, innocence and purity of the soul.


Next to the barcode, I wrote the legal information for the album in small black print.


I went online and saved a picture of the 'sony music' logo, and the 'compact disk' logo. I opened them up on Adobe CS4 and copied them.


I pasted both logos on the left hand side of the legal information. Then I used the brush tool in white at a reasonably low opacity behind the track list to make it stand out more.


 This is my final album back cover.

Sunday, 25 November 2012

Editing the Album Front Cover

I edited the front cover of my album using Adobe Photoshop CS4.


First I created the canvas for the album cover, using the measurements: 12cm x 12cm.


Using the canvas measurements, I calculated the measurements for each 'photostrip' (4cm x 12cm). There will be three photostrips, one for each member of the band.


I then used that to calculate the measurements for each photostrip box (4cm x 3cm).


I opened the first picture in Adobe Photoshop CS4, selected the whole picture, then copied it.


I pasted the picture into my 4cm x 3cm canvas, then I used 'transform' to resize the picture to the size of the small box.


I then used the selection tool again, to select and copy my resized picture.


I pasted the picture onto my 4cm x 12cm canvas.


I then moved the picture into position at the top of the 'photostrip'.


I repeated these steps for the next three pictures, then I selected all four pictures and copied them (merged).


I then pasted the 'photostrip' onto the first canvas I made, 12cm x 12cm. 


I dragged the strip to the left of the canvas, so that it was in the position I had planned.


I then repeated all those steps for the other two band members, which resulted in a full 12cm x 12cm canvas. I used random silly face for the top three pictures of each strip, then I made sure the final picture at the bottom of each strip was one of the actor smiling.


I used the 'rectangle' tool to draw a white box over the second and third row of pictures. I then reduce the 'fill' to 60%, making the rectangle semi-transparent.


I added the text 'Happy Face' in the large font 'copperplate gothic light' in a dark orange-brown colour, to stand out on the cover. Unlike most album covers, I am making the font size of the album title larger than the font size of the band's name.


I then added the text 'Destiny's Child' in a smaller font 'adobe caslon pro' in the colour black, to stand out on the cover.


This is the final front album cover.